This weekend Romeo is kicking off the holiday season with a village-wide Open House Weekend. We changed the window to reflect the change from fall to winter. That's always quite a job but it looks really nice. Sprucing up the shop was in order and things are looking quite festive now.
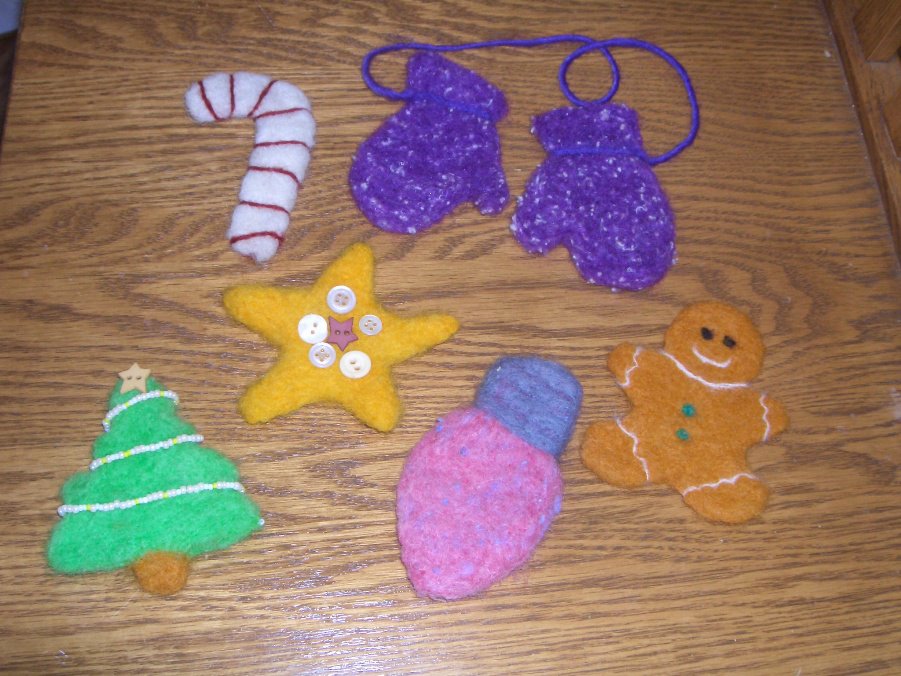
We decided to have a couple "Make & Take" workshops today at the store. Here is a picture of the Cookie Cutter Needle Felted Ornaments that I taught the workshop for . These ornaments are so fun to do. Easy with great results, especially after embellishments. I dyed the gold, brown and green roving. The pink and purple came from my stash. I really had a good time making these, and I can see myself making a LOT more of them. I just need to get my hands on a good selection of roving colors. I bought a tub of 40 holiday cookie cutters last week at Michael's with my 50% off coupon, so I'm good to go. Wouldn't these be a nice added touch, tied to the top of a gift? Or enclosed in a Christmas card to someone special?
Want to make some?
Here's what you need:
Cookie Cutters of your choice
Felting Needles
Wool roving in assorted colors
Foam block
Embellishments.....such as buttons, beads, etc.
Place cookie cutter on top of foam block. Fluff your roving by pulling small tufts. Place evenly into cookie cutter, making sure to fill to the edges, and keeping cookie cutter pressed onto the foam.
Start poking the roving with your felting needle. I start out with the 36 gauge needle, and then use a 40 gauge later on if I have some detail felting to do, such as the 'icing' on the gingerbread boy. Poke, poke, poke, poke, poke and then poke some more. Pay attention to the outside edges so that when you remove the cookie cutter the edges will be firm. When it looks like your ornament is starting to look more solid, remove the cookie cutter, and gently peel it off the foam. There will be lots of fibers that you have poked down into the foam, so when you turn over the ornament it will be fuzzy on the back side. Use your needle on this side now, cleaning up the fuzz. Keep felting on one side and then the other until you are happy with the appearance and feel of the ornament. You can clean up the edges by poking sideways into them, but just be careful of your fingers! Those needles are sharp and they WILL make you bleed. If you've poked enough, you will have a solid piece of wool felt.
Now add your embellishments. The gingerbread boy was embellished with thin white wool yarn for the icing, and small bits of colored roving for the eyes and buttons.Use your imagination to make each ornament a work of art. Add a hanger of your choice. Have fun!


8 comments:
That's brilliant! Thanks for posting :)
Thanks for the directions - now if I can put down the knitting long enough to try this. So cute!!
Trish!! Those mini-mittens and the gingerbread boy may very well be the cutest things ever!
I bought a small needle felting kit at the Allegan festival when I went (not this last one, the one before)... and I am terrible at it. Maybe I just don't have the patience. :D
Trish those are so cute!
Thanks for that. I needed some needle felting ideas for a workshop I'm teaching.
i love your cookie cutter felted ornaments! i needle felted a snowman yesterday (pic on todays blog post) how fun someone else is doing the same :)
the gingerbread man and light are my favorites :)
A truly inspired idea and I'm ready to make all kinds of ornaments to commemorate all kinds of events! Thanks so much for posting this-i love it!
Hi thanks for posting thiss
Post a Comment